http://www.hut.fi/~llauren/76115/documents/to.html
Last modified 3.11.1999
Version 1.0
| Version 0.9 | 1.11.1999 | Juha Itkonen | First draft |
| Version 1.0 | 3.11.1999 | Kati Laurila | Chapter 5. user Interface updated. ER-diagram updated in Chapter 3. Multiple minor changes done in all chapters. |
1. Introduction
2. Overview
3. Data and Database
4. Functions
5. User Interface
6. Other Functions
The PSP requires the practitioner to do a lot of measurements and data analysis. The main goal of the PSP-HUT system is to act as an easy and usable tool for PSP practitioners. The main functionality of the PSP-HUT system is to provide an easy and enjoyable way to record personal software process data, to communicate with other software developers, to do PSP exercises and to learn the PSP. The functionality is provided through a www-browser user interface and a standalone data recording application. All the functions are available through the www-browser but the data recording application is provided to make the mechanical and frustrating data recording task as easy, quick, precise and pleasant as possible. The data recording application also provides off-line functionality which enables data recording when the network connection to the PSP-HUT server is not available.
The PSP system must be able to gather data based on many kinds of official PSP forms, and the amount and details of data collected depend on the PSP level used. To avoid the need for using a great number of different database tables for storing the data and to make it easy to modify the system a general approach for storing the PSP data is designed.
The main components of the PSP-HUT system are the www-browser interface, the ViCa applet, the data collection client, the www-server, the web site and content management, data management and the MESS metrics database server which are presented in diagram 0.1. The client side components communicate with the server using the HTTP-protocol. The www-browser client uses html-pages with standard forms and buttons. The data collection client uses xml to post data to the server and to get messages from the server.
Diagram 0.1: The high level component and data flow diagram
The data collection clients use specified xml notation to post data to the system. This enables constructing any kind of data collection clients for the PSP-HUT system. For example data collection plugins for development tools could be a very good extension to the PSP-HUT system.
The server side functionality is implemented using Java programming language and Java servlets.
The Personal Software Process (PSP) is a disciplined approach for teaching software engineers basic principles of software engineering. The PSP is a staged approach, in which more advanced practices are introduced once the earlier ones have been applied for some time. The PSP has been shown to have remarkable improvements in the engineer's ability to estimate and plan his own software development work, as well as produce higher quality products.
The PSP requires the practitioner to do a lot of measurements and data analysis. All this requires a lot of manual work and therefore the usage of PSP has been been quite demanding . The PSP-HUT community server system is designed to allow the PSP student or practitioner to easily and efficiently input his data, and help him to get the necessary feedback with a minimum of overhead on his part.
The system is designed for professional software developers who will use it to collect their personal PSP data and analyze it. The system also provides a possibility to organize and maintain PSP courses in which students can learn by reading lessons and instructions and doing assignments. All this is done by following the PSP process and inputting their metrics data to the server.
The main goals of the system are to make learning and practicing the PSP as simple, easy and enjoyable as possible. Emphasis will be placed more on the usability of the core functions of the system than on the amount of features implemented.
This document specifies the functionality that the PSP-HUT system will provide to the users. The overview of the whole system, architecture, components and data flows is given in chapter 2. The data model and database structure are described in chapter 3. Chapter 4 lists and describes all the functions of the system using use cases. The user interface is described in chapter 5 and the non-functional properties of the system in chapter 6. All the terms are declared and concepts are defined in the glossary document.
This document is made based on the Requirements Specification of PSP-HUT system (v. X.X)
The software developers use the PSP-HUT system to record their personal software process data, to communicate with other developers and to learn PSP. The functionality of the system is designed to provide good tools to support these purposes. All the functions are available using standard www-browser application. In addition, the system provides a client side CheckMate application for data recording. The purpose of the distinct CheckMate application is to make the mechanical and frustrating data recording task as easy, quick, precise, and pleasant as possible. Furthermore, the CheckMate application enables off-line data recording when the network connection to the PSP-HUT server is not available or the server is out of function.
The main components of the PSP-HUT system are the www-browser, the ViCa applet, the data collection client, the www-server, the website and content management, data management and the MESS metrics database server which are presented in diagram 0.1. The client side components communicate with the server using the HTTP-protocol. The www-browser client uses html-pages with standard forms and buttons. The data collection client uses xml to post data to the server and to get messages from the server.
The component diagram 2.1 describes the high component level architecture of the system. Furthermore, the diagram describes the data flow through the system. The arrows in the diagram represent the data flows between the components, and each arrow is associated with a corresponding data type. The data types used to pass data between the components are:
The data transfer protocol is defined if relevant. If the protocol is defined it is marked in parentheses after the data type.
The type of each component is marked between <<>> marks. The "Ext. App." -type denotes that the component is external application i.e. some standalone application that the PSP-HUT system interacts with. If the type is not marked the component is a Java component.
The "LOC mate", "Emacs plugin", "Email handler" and "Email server" components
are mentioned in the diagram just as examples of external components that can be incorporated to the system. They
will not be implemented as part of this project.

Diagram 2.1: The component and data flow diagram of the system
The data collection client is a stand-alone application consisting of the "Check Mate", "Data communicator" and "XML handler utility" components. The Check Mate component provides the user interface that makes it easy to record time and defect statistics. It internally uses the Data communicator component to send requests and PSP data and receive responses and acknowledgments. The data communicator uses the XML handler component to convert the messages into XML form so that they can be sent to the server. Similar XML messages can be sent by other external data collectors as well, for example by an Emacs plugin for measuring PSP data directly from the editor.
The LOC mate component is a counting utility for recording lines of code measures for CheckMate.
All the basic functionality can be used with just a WWW browser, although the insertion of data is easier if done using collectors like Check Mate.
The "ViCa" component is an applet provided by the LUCOS research project. It communicates directly with the MESS server using the HTTP protocol.
All the server functionality, except ViCa, is provided through an Apache WWW server. The "Web site generator" component represents all static and dynamic WWW pages that belong to the system. The communication-related parts of the system, like on-line chat and news groups, are provided by the "Communication manager" component.
The dynamic content of the pages is created by servlets that use the "Content server" component to get the information to show, for example a certain form of a certain PSP work to a certain PSP user.
XML requests arrive to a specified URL and are handled by the "XML handler" component, which parses the XML requests and uses the "Content server" to fulfill the requests. The Content server changes the content requests into more simple, atomic requests and uses the "Request handler" component to get responses to the requests. The Request handler turns the requests into SQL statements and gets them executed by calling the "Database communicator" component, which executes the statements using the LUCOS Server Protocol.
The XML handler component can be used to handle XML request arriving from any source, so it is possible to implement for example an Email handler component that receives XML messages by email and hands them on to the XML handler. The client side component "XML handler utility" and server side XML handler are in practice similar components.
The PSP system must be able to gather data based on many kinds of official PSP forms, and the amount and details of data collected depend on the PSP level used. To avoid the need for using a great number of different database tables for storing the data and to make it easy to modify the system a general approach for storing the PSP data was designed. The logical ER model describing the entities used for storing information about users, user groups, PSP courses and the PSP data can be seen in diagram 3.2. IE (Information Engineering) notation is used in the ER diagram. The main points of the notation are explained in table 3.1.
|
logical entity |
|
|
weak logical entity, that is an entity that cannot be identified on its own without an identifying relation to a non-weak entity |
|
|
zero or one |
|
|
exactly one |
|
|
many (zero or more) |
|
|
many (one or more) |
|
|
relationship |
|
|
identifying relationship |

Diagram 3.2: ER diagram describing the data model of the system
The main entities in the system are "user", "group" and "PSP work". Everyone who
is using the system is a user. A user can belong to one or more groups, each of which has one or more group leaders.
The group can be formed for a PSP course or for a work project, for example. The groups are organized into categories
and each group can belong to only one category.
A PSP work consists of all the PSP data that is gathered for a specific task or project. A PSP work is personal and is always related to one user. A PSP work can also belong to a "PSP work pool" of a group if the user owning the work chooses to attach the work to a certain group. To support also PSP level 3, a PSP work can contain other PSP works.
A PSP work is always done using a particular PSP level. The PSP level determines which data sheets, which rows on certain data sheets, and finally, which data cells on those rows can be filled in by the user. To be able to keep the database rather simple, the structure of the data is not stored in the database structure, but in actual data in the database. In practice this is done using the type entities (DataSheetType, DataRowType and DataCellType). When a user creates a PSP work, a set of empty data sheets, data rows and data cells are created using the information in the type entities. First the data sheets needed can be created using the PSPLevel - DataSheetType relation that tells which sheets are needed. Then the data rows can be created using the PSPLevelDataRows relation that tells which rows are needed and finally the cells can be created using the PSPLevelDataRows relation.
The data model also supports the creation of group materials for different types of groups. The group material is a collection of phases, which in turn are collections of instructions and PSP work templates. A phase can be for example one lesson in a PSP course and a development cycle in a PSP project. The instructions can contain text, for example general PSP hints or more specified instructions for a phase or a PSP work. The PSP work templates are definitions of empty PSP works that can be instantiated by a user. A template can be created for example for a coding assignment for which the course attendees should collect PSP data. Predefined phases, PSP work templates and instructions can be reused for creating new courses.
Functions are described as use cases. Due to quite large amount of use cases, they are placed under five categories:
Use cases will be implemented in the priority order which refer to priorities of the related requirements. Some use cases that relate to an useful or a nice to have requirement may be implemented only so that the database offers possibility to utilize the use case but the use case itself is not implemented. Use cases related to PSP works and personal information are the ones with highest priority.
The following tables give a short summary of the use cases. Information given in the tables is explained below. More detailed description of the use cases can be found in the subchapters of this chapter.
The type of the use case specifies how the use case is utilized
User means that the use case belongs to ordinary user activities which
are performed quite frequently by any user when using this system
Admin means that the use case belongs to administrative activities
which are performed by quite few users having special administrative roles
Actor specifies who utilizes the use case (for explanations refer to Glossary):
P = PSP User
G = Group Leader
C = Category Administrator
R = Root
Reference to UI specifies which user interface elements the actor needs to utilize the use case
(for explanations see Chapter 6):
LogIn = Login window
PerSe = Personal section
GroSe = Groups section
WorSe = Work section
SupSe = Support section
|
Name of the use case |
Type of the use case |
Actors |
Reference to UI |
|||||||
|
P |
G |
C |
R |
LogIn |
PerSe |
GroSe |
WorSe |
SupSe |
||
| 4.1.1. Register to the system | User | x | x | |||||||
| 4.1.2. Login | User | x | x | x | ||||||
| 4.1.3. View and update own personal information | User | x | x | |||||||
| 4.1.4. View/Print personal PSP data | User | x | x | |||||||
| 4.1.5. Resign from the system | User | x | x | |||||||
| 4.1.6. Manage PSP users | Admin | x | x | |||||||
|
Name of the use case |
Type of the use case |
Actors |
Reference to UI |
|||||||
|
P |
G |
C |
R |
LogIn |
PerSe |
GroSe |
WorSe |
SupSe |
||
| 4.2.1. View and join any groups | User | x | x | |||||||
| 4.2.2. View own groups and update own membership | User | x | x | |||||||
| 4.2.3. View/Print the PSP data of own group | User | x | x | x | ||||||
| 4.2.4. Create a new group | User (Admin) | x | (x) | (x) | x | |||||
| 4.2.5. Manage existing groups | Admin | x | x | x | ||||||
| 4.2.6. Create and maintain the materials for a group (event structure, PSP work templates and instructions) | Admin | x | ||||||||
| 4.2.7. Create a new category to the group hierarchy | Admin | x | x | x | ||||||
| 4.2.8. Manage existing categories | Admin | x | x | x | ||||||
|
Name of the use case |
Type of the use case |
Actors |
Reference to UI |
|||||||
|
P |
G |
C |
R |
LogIn |
PerSe |
GroSe |
WorSe |
SupSe |
||
| 4.3.1. Create own PSP work | User | x | x | |||||||
| 4.3.2. View/Print own PSP work and PSP data | User | x | x | |||||||
| 4.3.3. Enter PSP data to own PSP work | User | x | x | |||||||
| 4.3.4. Delete and complete own PSP work | User | x | x | |||||||
|
Name of the use case |
Type of the use case |
Actors |
Reference to UI |
|||||||
|
P |
G |
C |
R |
LogIn |
PerSe |
GroSe |
WorSe |
SupSe |
||
| 4.4.1. View/Print PSP instructions and templates | User | x | x | |||||||
|
Name of the use case |
Type of the use case |
Actors |
Reference to UI |
|||||||
|
P |
G |
C |
R |
LogIn |
PerSe |
GroSe |
WorSe |
SupSe |
||
| 4.5.1. Communicate by message board | User | x | ||||||||
| 4.5.2. Communicate by mail | User | x | ||||||||
| 4.5.3. Communicate by chat | User | x | ||||||||
The precondition of every use case is that the system is up and running.
Related requirement: 3.1. Register to the system as a PSP user
Precondition: User has found and opened the system.
Flow of events:
- The system opens Login window
- The user selects Register
- The system opens an empty Personal section and asks the user to fill in the personal information
- The user enters the mandatory information
- name
- user ID
- password. Password is verified by entering it twice.
- contact information
- can user's PSP data be used in benchmarking and statistical purposes: yes / no
- The user can enter the optional information
- desired PSP level (used as a default when user creates a PSP work)
- PSP data scale for time recording: 1 hour / 1 minute (if left empty 1 minute is used as default)
- defect subtypes: user's own more detailed subtypes for defects
- The user submits the information.
- The system verifies the information
- The system registers new PSP user to the system and gives feedback to the user about the success of registering.
Exceptions: In step 7, if any information is incorrect (same user ID already exists, format of any information
is incorrect, two given passwords do not match) or incomplete (some mandatory information is missing), the system
will prompt the user to correct the information.
The user can cancel the operation at any step. If canceled, the system closes.
Post condition: New PSP user has been successfully registered to the system.
Related requirement: -
Precondition: User has found and opened the system and has been registered to be a PSP user
Flow of events:
Exceptions: In step 3, if login information is incorrect (the user ID does not exist, given password
do not match) or incomplete (the user ID or the password is missing), the system will prompt the user to correct
the information.
The user can cancel the operation at any step. If canceled, the system closes.
Post condition: The PSP user has been successfully logged in.
Related requirement: 3.2. Update and delete own basic PSP user information
Precondition: PSP user has logged in to the system.
Flow of events:
Exceptions:
In step 4, if any information is incorrect (format of any information is incorrect) or incomplete (any required
information is missing), the system will prompt the user to correct the information.
The user can cancel the changes before submitting. If canceled, the system reloads the personal information as
it was before changes.
Post condition: The PSP user information has been successfully viewed/updated.
Related requirement: 3.21. View PSP data (based on own permissions), 3.22. Print PSP data (based on own
permissions)
Precondition: PSP user has logged in to the system.
Flow of events:
Exceptions: -
Post condition: The system has successfully displayed/printed the personal PSP data.
Related requirement: 3.2. Update and delete own basic PSP user information
Precondition: PSP user has logged in to the system.
Flow of events:
- The user selects Personal section
- The system opens Personal section
- The user selects Resign
- The system verifies that the user really wants to resign from the system and asks if the user wants to leave his/her PSP data anonymously available for benchmarking or if he/she wants all his/her PSP data to be deleted.
- User selects the resigning option she/he wants.
- If the user selects resign and leave his/her PSP data available
- the system deletes the personal information (name, contact information, password) and releases the user ID.
- the system gives feedback to the user about the success of resigning
- If the user selects resign and PSP data to be deleted
- the system deletes the personal information (name, contact information, password), releases the user ID and deletes all the user's PSP data
- the system gives feedback to the user about the success of resigning
- The system closes.
Exceptions: In step 5, the user can cancel the operation. If canceled, the system closes the resigning
window.
Post condition: The PSP user has been successfully resigned from the system
Related Requirement: 3.3. Create new, update & delete basic PSP user information
Precondition: User has logged in as root
Flow of events:
- The user selects Personal section
- The system opens Personal section
- If user wants to create a new PSP user, he/she selects Register New User
- Events are the same as events 3-7 in use case 4.1.1. Register to the system.
- If user wants to view/update the user information of an existing PSP user, he/she selects the user ID of the PSP user whose information he/she wants to view/update
- Events are the same as events 2-5 in use case 4.1.3. View and update personal information
- If user wants to resign an existing PSP user, he/she selects the user ID of the PSP user who he/she wants to resign
- Events are the same as events 2-7 in use case 4.1.4 Resign from the system
- The system informs the PSP user who has been registered to / resigned from the system or whose user information has been updated about the operation. (-> Messages of the Day)
Exceptions: Exceptions are the same as in use cases 4.1.1, 4.1.3 and 4.1.4.
Post condition: Exceptions are the same as in use cases 4.1.1, 4.1.3 and 4.1.4.
Related requirement: 3.8 Register to an open group, 3.9. Request the group membership of a closed group
Precondition: User has logged in
Flow of events:
Exceptions: The user can cancel the operation in step 7
Post condition: The user has successfully joined/applied membership to the selected group.
Related requirement: 3.11. Resign from a group
Precondition: User has logged in
Flow of events:
Exceptions: -
Post condition: The system has successfully displayed the group information / updated membership situation.
Related requirement: 3.21. View PSP data (based on own permissions), 3.22. Print PSP data (based on own
permissions)
Precondition: PSP user has logged in to the system.
Flow of events:
Exceptions: -
Post condition: The system has successfully displayed/printed the PSP data of the group.
Related requirement: 3.4. Request the creation of new group and group leadership, 3.5. Create new group
and group leadership
Precondition: User has logged in.
Flow of events:
- The user selects Groups section
- The system opens Groups section
- The user selects Create New Group
- The system opens the group creation form
- The user enters
- group ID
- group name
- description
- user ID(s) of the group leader(s)
- The user selects
- type of the group: course / project work / other
- openness of the group: open / closed / hidden
- (sub)category to which this group belongs
- are user specific settings accepted for group members: yes / no (concerns only those PSP works that a group member links to the group)
- If the user selects that user specific settings are not accepted, then the user must select group specific settings (if some of the group settings is left undefined, are user specific settings allowed for those settings)
- PSP level (in those PSP works which a group member links to the group)
- type of PSP work: job / exercise
- can PSP data be used in benchmarking and statistical purposes: yes / no (concerns only those PSP works that a group member links to the group)
- PSP data scale: 1 hour / 1 minute
- If the user selects that user specific settings are accepted, then the user can not select any of group specific settings
- The user submits the information.
- The system verifies the information
- The system checks, does the user have the permission to create the group.
- If yes, the system creates the group and gives feedback to the user about the success of the creation. The system informs the group leaders that the new group has been created (-> Messages of Today)
- If not, the system sends the group creation request to the root/category administrator (-> Messages of Today) and gives feedback to the user about the success of the request. The root/category administrator handles the request in the following way (after having received the message):
- The root/category administrator selects the desired group creation request from the list of open requests (Groups section)
- The system opens the selected group creation request
- The root/category administrator verifies the group information and modifies it if needed.
- The root/category administrator accepts or declines the request
- If the root/category administrator accepts the request, the system verifies the information, creates the new group and informs the group leaders that the new group has been created. (-> Messages of Today)
- If the root/category administrator declines the request, the system informs the group leaders that the request has not been accepted. (-> Messages of Today)
Exceptions: In step 10 or 13.5, if any information is incorrect (same group ID already exists, user ID(s)
of group leader(s) do(es) not exist, format of any information is incorrect) or incomplete (any required information
is missing), the system will prompt the user to correct the information.
The user can cancel the operation at any step. If canceled, the system closes the form.
Post condition: New group has been successfully created (unless request declined.)
Related Requirement: 3.6. Update basic group information, 3.7. Update & Delete basic group
information, 3.10. Register PSP user to be a member of a group, 3.12. Resign PSP user from a group
Precondition: User has logged in as root or is a group leader
Flow of events:
- The user selects Groups section
- The system opens Groups section
- The user selects view My Groups
- The user selects the group which information he/she wants to view and selects Manage. (Manage is visible only to group leaders)
- The system opens the information form of that group
- If the user wants to update the group information of an existing group,
- The user updates the information (information that can be changed: description, user ID of the group leaders, openness of the group)
- The user submits the information.
- The system verifies the information, updates the information and gives feedback to the user about the success of updating.
- The system informs the group leader(s) of the updating. (-> Messages of the Day)
- If the user wants to resign an existing group,
- The user selects Resign group
- The system verifies that the user really wants to resign the group from the system.
- If yes, the system releases the group ID, gives feedback to the user about the success of resigning and closes the resigning window. The system informs the PSP users who has been members/group leaders of the group that the group has been resigned. (-> Messages of the Day)
- If the user wants to register new member to the group from the membership applications, she/he selects the desired application from the list of open applications and either accepts or denies the application.
- If the user selects accept, the system adds the user who applied the membership to the group and informs the new group member that she/he has been registered to the group. (-> Messages of the Day)
- If the user selects deny, the system informs the user who applied the membership that the application was denied. (-> Messages of the Day). The user could also be able to write a message to the applicant (e.g. why she/he was not accepted to the group).
- The system gives the user feedback about the success of the operation.
- If the user wants to invite a new member to the group, she/he selects Invite new member
- The system opens a list of all the PSP users
- The user selects the PSP user(s) to be invited
- The system registers all the selected PSP users to be members of the group
- The system gives feedback to the user about who was successfully registered and who not
- The system informs the PSP users that they have been invited to the group. (-> Messages of the Day)
- If the user wants to resign a member from the group, she/he selects the desired group member(s) and selects Resign member
- The system verifies that the user really wants to resign the selected members from the group
- If yes, the system removes the PSP user(s) from the selected group and gives the user feedback about the success of the operation. The system informs the PSP users who had been resigned about the operation.
Exceptions: In any step where the system verifies the information, if any information is incorrect or
incomplete, the system will prompt the user to correct the information.
The user can cancel all the activities.
Post condition: Group management activity has been successfully performed.
Some explanations:
For a course type group the event structure can refer e.g. to lessons, PSP work templates e.g. to exercises and
instructions e.g. to exercise assignments or other type of instructions.
For a project work type group the event structure can refer e.g. to project phases or increments, PSP work templates
e.g. to project tasks and instructions e.g. to project work descriptions or other type of instructions.
Related requirement: 3.13. Create course structure and contents (including exercises and instructions)
Precondition: PSP user has logged in to the system and is a group leader.
Flow of events:
Exceptions: In step 9, if the syntax is incorrect the system prompts the user to correct the information.
Post condition: New course is added to the course list
Note! The highest level categories can be created only by root. Subcategories can be created also by category administrators.
Related requirement: -
Precondition: User has logged in as root or is a category administrator
Flow of events:
- The user selects Groups section
- The system opens Groups section
- The user selects Create New Category
- The system opens an category creation form
- The user selects the place from the group hierarchy he/she wants this new (sub)category to be placed
- The user enters
- name of the category
- description of the category
- user ID(s) of the category administrator(s)
- The user submits the information.
- The system verifies the information, creates the new category and gives feedback to the user about the success of the request.
- If the category administrator of the new category is not the user him/herself, he system informs the category administrator that the category has been created (-> Messages of the Day)
Exceptions: In step 7, if any information is incorrect (format of any information is incorrect) or incomplete
(any required information is missing), the system will prompt the user to correct the information.
Post condition: New category has successfully been created
Related requirement: -
Precondition: User has logged in as root or is a category administrator
Flow of events:
- The user selects Groups section
- The system opens Groups section
- The user selects the category which information he/she wants to view and selects Manage. (Manage is visible only to root/category administrators)
- The system opens the information form of that category
- If the user wants to update the information,
- The user updates the information (information that can be changed: description, user ID of the category administrators)
- The user submits the information.
- The system verifies the information, updates the information and gives feedback to the user about the success of updating.
- The system informs the category administrator(s) of the updating. (-> Messages of the Day)
- If the user wants to delete an existing category,
- The user selects Delete category
- The system verifies that the user really wants to delete the category
- If yes, the system verifies that the category is empty (there is no groups or subcategories under this category), deletes the category and gives feedback to the user about the success of deleting.
- The system informs the category administrator(s) of the updating. (-> Messages of the Day)
Exceptions: In step 6.3, if any information is incorrect (format of any information is incorrect) or
incomplete (any required information is missing), the system will prompt the user to correct the information.
The user can cancel the deleting, in step 7.3,
Post condition: The category has successfully been deleted.
Related requirement: Create own PSP work
Precondition: The user has logged in
Flow of events:
- The user selects Works section
- The system opens Works section
- The user selects Create New Work
- The system opens creation form and asks if the user wants to link this PSP work to a group.
- If the user does not want to link this PSP work to a group,
- The system inserts the user specific defaults for the PSP work (PSP level / type of the PSP work / PSP data scale / using PSP data for benchmarking), which the user can modify.
- The user enters name to this PSP work and can modify the settings.
- The user submits the information
- If the user wants to link this PSP work to a group,
- The user selects the group ID of the group from the list that contains all those groups which member the user is and submits the information
- The system checks the type of the group
- If the group type is course,
- The system asks the user to select the PSP work from the selection list containing the exercises of the course
- The user selects the desired exercise.
- If the group type is not course,
- The system checks if there are any predefined PSP works
- If yes,
- The system asks the user to select PSP work from the selection list
- The user selects the desired PSP work.
- If no,
- The system checks if there are any group specific settings for the PSP work.
- The system opens a PSP work creation form, where
- the system has inserted the group specific settings for the PSP work (PSP level / type of the PSP work / PSP data scale / using PSP data for benchmarking), which the user can not modify.
- for the rest of the settings, the system has inserted the user specific defaults for the PSP work (PSP level / type of the PSP work / PSP data scale / using PSP data for benchmarking), which the user can modify.
- The user enters name to this PSP work and can modify the settings which are not group specific.
- The user submits the information
- The system verifies the information, creates the PSP work and gives feedback to the user about the success of creating the PSP work
Exceptions: In step 7, if any information is incorrect or incomplete (any required information is missing),
the system will prompt the user to correct the information.
The user can cancel the creation at any step.
Post condition: New PSP work has been successfully created
Related requirement: 3.18. Find own PSP work, 3.21. View PSP data (based on own permissions), 3.22. Print
PSP data (based on own permissions)
Precondition: The user has logged in
Flow of events:
Exceptions: -
Post condition: The system has successfully opened/printed the desired PSP work.
Related requirement: 3.18. Find own PSP work, 3.20. Insert, update and delete PSP data related to a PSP
work
Precondition: The user has logged in
Flow of events: The user has two options in entering the PSP data:
1) Using the data forms of PSP work in Works section
2) Using Check Mate
Exceptions: -
Post condition: The system has successfully updated the PSP data of the PSP work.
Related requirement: 3.18. Find own PSP work, 3.19. Update and delete the basic information of own PSP
work
Precondition: The user has logged in
Flow of events:
Exceptions: The user can cancel the both operations.
Post condition: The system has successfully deleted/completed the PSP work.
Related requirement: 3.23. Print PSP data template
Precondition: The user has logged in
Flow of events:
Exceptions: -
Post condition: The system has successfully opened/printed the desired PSP instruction/template.
Following communication use cases are used if there is not an existing reusable communication board.
Additional information: Existing module could be used and i.e private NNTP server.
Related requirement: 3.14. Communicate by message board
Precondition: PSP user has logged in to the system
Flow of events:
Exceptions: -
Post condition: Message board is updated / Desired messages have been read.
Additional information: standard SMTP/POP/IMAP could be used
Related requirement: 3.15. Communicate by mail
Precondition: PSP user has logged in to the system
Flow of events:
Exceptions: -
Post condition: Sent message are delivered to the right person / own messages has been read.
Additional information: Existing component should be used
Related requirement: 3.16. Communicate by chat
Precondition: PSP user has logged in to the system
Flow of events:
- The user selects the Groups section
- The system opens the Groups section
- The user chooses chat
- The system opens the list of chat rooms
- The user chooses the room he/she wants to join
- The system opens the chat window
- The window has the line where the user writes own lines and the window where everyone's text appears
Exceptions: -
Post condition: The user has chatted successfully.
User interface has been here defined only for an ordinary PSP user for daily PSP-HUT activities. Root (and possibly some other administrative roles) require somewhat different user interface.
The Personal Epicenter (working title) is the central point for the PSP-HUT user to perform his or her PSP duties in the PSP-HUT community. It consists of a set of sections, each with a specific use (although the use of some of the sections do overlap a bit). The sections, which are shown as tabbed pages, are
Other sections may be specified as well, since the PSP-HUT system is a modular, expandable one.
The Epicenter is to be realized as dynamically generated html[1] pages ("dynamic" HTML 4.0 with JavaScript). An alternative approach is to realize the Epicenter as an embedded application in the www-browser, i.e. a Java applet or a Tcl/Tk "tclet".
The terms that are used in this user interface description are visualized in figure 5.1.0 below.
Fig 5.1.0: Terms used in UI description
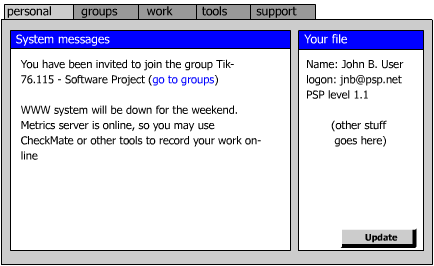
Fig 5.1.1.1.: Rough sketch of the personal section
The first section the user will be shown upon logging on to the PSP-HUT, is the Personal section (PerSe). This section contains two fields, one with system messages and one with personal information and settings (Your file).
Possible entries in the system messages are
System messages should contain links where appropriate. Information on groups should lead to the Groups section. Links leading to pages outside the Personal Epicenter (systems messages, perhaps) should contain a link for returning to the the Personal section[3].
Personal information and settings (Your file) show the user information (Username, name, contact information, PSP defaults and personal PSP settings (PSP level, personal subtypes for defects etc.). This information may be edited in place (some settings like the personal subtypes for defects may require a separate window to be opened). The information is stored by clicking an Update button (if required by the implementation). There is also a Revert button (i.e. a html "reset" button) to reset the values to what they were prior to editing the page. User can also view his/her own personal PSP statistics from this section. The calculated PSP statistics are naturally not editable.
[insert-image-here]
The Work section (WorSe) contains two subsections, one to display the current (active) and past PSP works (archive) of the user and one to create a new PSP work.
[insert-image-here]
This page is divided into two panes. On the left, smaller pane, are the works listed in a hierarchically ordered manner. The list of the PSP works can be sorted and filtered based on different criteria (e.g. active/passive, group hierarchy based sorting for works that belong to some group) First come the active works, then the finished ones. On the larger pane, the user can view all the PSP data forms, the actual PSP data and other information related to the selected PSP work and also enter new PSP data to the work.
(remark: this section is really vaguely described at the moment)
[insert-image-here]
In this subsection the user may create new PSP work his/her work stack as specified in the use case 4.3.1.
The Group section has two subsections - one to list "My groups" and one to list "All groups".
The "All Groups" subsection
From "All groups" subsection the user may view all the existing groups, choose to join to a new group (an open group may be joined directly by the user, whereas in case of a closed group a membership application is created to the group leader), or create a new group.
The layout of the "all groups" section is two-pane, where the group hierarchy is displayed. On the right pane are showed a list of the existing groups (the "outermost leaves" of the group tree) in a compact format -- group id and short one-line description/visual name, plus icons to show the user's status regarding to this group (e.g. member, group leader, applying the membership of the group, invited to group), type of the group and whether the group is open or closed. On clicking this info bar (or a button on it), the group information is expanded to show a more verbose group description, group specific PSP settings, number of members in this group and a button to join this group, accept invitation or if the user already is a member, a button to resign from the group.
The "My Groups" subsection
The "My Groups" subsection is quite much the same as the "All Groups" subsection. Almost the only difference is that only the user's own groups are listed. (Own meaning those groups that the user is member or leader of , those which the user has been invited to join and those which membership the user has requested).
The layout of the My Groups subsection is simply a "flat" scrollable list, as we believe that a user will not be a member of so many groups as to call for a hierarchical interface. The groups are listed in hierarchical order, though. If experience proves it necessary, more sorting orders and hierarchical listing will be introduced. From the "My Groups" subsection, the user is given functionality to update the membership status (accept/deny invitations, resign from the group).
(remark: Left unspecified at the moment. Open for development.)
This section is intentionally left unspecified at the moment. It is mentioned here just to give focus to the fact that the PSP-HUT is an extendable system
(remark: this section is really vaguely described at the moment)
Contains PSP instructions and process scripts, PSP data templates, help, links, phone numbers and other helpful information.
[2] This really is just a polite way of informing the user that s/he has been resigned from the group. There is no way not to accept a resignation. (return)
[3] Forcing the user to use the browser's Back button is strongly discouraged. This is because browsers usually pick the page from their local cache instead of loading a fresh copy over the net, resulting in possibly outdated data upon returning to the page. (return)
[4] "none" or personal being perfectly valid options (return)
The PSP-HUT system is designed to be a modular one. It can take its input from any source adhering to the set PSP-HUT data format and standards[1]. CheckMate is such a device. It is a small, easy to use stand-alone program. With CheckMate the user can keep track of her/his software development time and report simple error cases. The program handles multiple tasks and has a minimal desktop footprint.
The data logged is sent to the PSP-HUT system, where it can be edited on a later stage. If the user has an open Internet connection, the data is sent right away, otherwise it is logged on a local file and sent at a later stage.
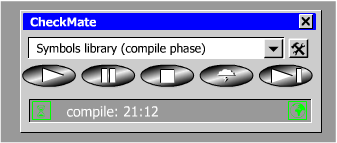
Fig. 5.2.1.1 - Rough sketch of the program main window layout
The application is divided into three rows. On the first row, there is a dropdown list containing all the user's active PSP works. The time used will be recorded for the selected PSP work. If the time is running for one PSP work when it is switched, the time for that PSP work is stopped. The time is not automatically started for the new PSP Work (ofd).
On the second row are five VCR-like buttons.
|> (play button) is to denote that the working has started.
|| (pause button) that the user is taking a break. The user may enter a reason for the break on a separate line appearing below the buttons (ofd: optionally in a separate dialogue). Work recording is resumed by pressing the pause button or the play button.
[_] (stop button) is for stopping the work for a longer time
@*#?! (bug) is to report that a bug has been detected. Pressing this button will open a bug report form for the user to log defects as specified in PSP. The bug reporting can be used two ways. User founds the bug and presses the bug button. When the bug has been recorded and corrected, the bug is marked done and CheckMate automatically records the time taken for the procedure. (Actually the CheckMate suggests the fix time, but user is also able to modify it (e.g. in cases when recording several bugs at the same time).
|>|> (next) is for going to the next PSP phase. This is an irreversible process and the user is presented with a confirmation dialogue confirming that s/he really wants to proceed
(The icons on the buttons are but rough sketches of what they eventually will be)
On the third row, there is a clock displaying the time used for the active phase, total time taken for the task or remaining budgeted time (ofd), switchable by clicking the clock (·) icon.
All rows have a small (Netscape Communicator-like) button at the left --marked : in this documentation-- to minimize the specific row to make CheckMate occupy even less desk space. Thus hidden functionalities may be reached using a popup menu triggered by the secondary mouse button. On platforms supporting this, the application may be connected to an icon on the taskbar/launch bar/etc.
There will be a configuration window yet to specify, where the user may specify PSP-HUT details like urls, usernames and passwords. This configuration window is launched by clicking a button on the application, the place of which remains to be specified. For now it is placed at the far right on the first row.
An alternative approach to the CheckMate layout is only to display the third row (the time row) of the program when it is running in it's normal state (i.e. in the background, counting out time). When the program receives input focus (i.e. when the mouse passes over the application), it grows to a larger size showing all the rows.
CheckMate is to be ported to all common platforms[2].
[2] i.e. Linux running XWindows, MS Windows (95, 98, NT4, w2k) and MacOS. Other possible
ports in consideration. (return)
One of the most important requirement of this system is that is has a good usability. The main objectives of usability are:
The system is provided with good quality user documentation which is complete, correct, unambiguous, consistent, modifiable and written in English.
The system is provided with good quality technical documentation which is complete, correct and consistent.
The system interfaces support the adding of new components and features. Interfaces are well defined and clearly documented.
System architecture is clearly structured and forms a core which is easy to expand in future versions.
Response time of data input and calculation operations is less than 1.0 s in undisturbed 100 Mbit/s local area network with unloaded server. (The delay caused by the components provided by customer (Visualization applet ViCa and measurement database Mess) is excluded.)
Response time must not increase exponentially in relation to the increase of the amount of the users when amount of users stays under 1000. (The delay caused by the components provided by customer (Visualization applet ViCa and measurement database Mess) is excluded.)
Client software works both with Netscape and MS Internet Explorer (version 4.0 or higher) browsers.
Server works both in Linux and Windows NT 4.0 SP5 environments.